Showing posts with label easy free knitting pattern. Show all posts

Monday, October 22, 2018

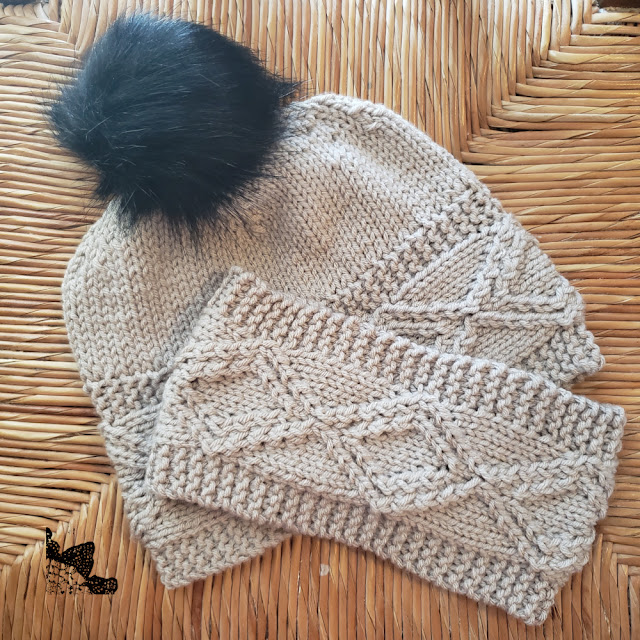
Diamond Dimensions Hat and Ear Warmer

A Free and Paid Knitting Pattern


I have two new knitting patterns for you today. I wanted to make a similar hat to my Wellsley Hat, but without the extra seaming. This time the texture pattern is a little bit different and the band is kitchener stitched together for a seamless finish. Below I will have the free pattern for the ear warmer and there will be a chance to buy the hat pattern through my Ravelry Store. 

While I was working on this pattern I thought it would pair really well with my Diamond Dimensions Neck Warmer, so that is why you might recognize the name. They would be the perfect set to gift together.

This time I used Patons Canadiana Yarn for the ear warmer and hat. This is some of my favorite yarn, I have never been unhappy with it. I wore this hat the other day, and I forgot the hat was even on. This yarn is just so comfortable and soft.

**Can I just say one quick thing about the Wellsley Hat? It's been up on the blog for 2 months and it is already my top 7th pattern on the blog out of almost 7 years of designs. Thanks for all of your love on this pattern.** 


Where can I get this Pattern?


This is a free knitting pattern found right here on Designs by Diligence. Just keep scrolling down to read the pattern. If you would like to purchase an ads free, printer friendly PDF you can through my Ravelry Pattern Store for $3.00.
<-------->buy now <--------->

When you purchase this pattern you will get the pattern for the Ear Warmer, Hat, and charts to help you create these stunning projects. 


Stay Connected!

If you like this pattern be sure to subscribe to Designs by Diligence to get notified when new patterns come out. The only time you will get an email is when a new post happens on the blog, usually on Tuesday.

You can also follow me through my social media sites. I love sharing sneak peeks, wips, and fiber arts news and projects.
Facebook

Instagram

Pinterest


Designer: Julia Schwartz

Yarn: Any worsted weight yarn. Model used Patons Canadiana 100% acrylic, 100 g / 3.5 oz, 187 m / 205 yds. (Hat uses 100 yds.).

Needles: 7/ 4.5mm

Notions: Yarn needle for weaving in your ends

Gauge: 16 stitches and 22 rows = 4 inches Size: 21 inch circumference (stretches to fit an adult head. My head is 23 and it is perfect)

Stitches used: k (Knit), p (purl), RT (Right Twist), LT (Left Twist), k2tog (knit 2 together), k2togb (knit 2 together though the back loop), PM (place marker)
Special Stitches:

  • Right Twist (RT): Knit 2 together keeping both stitches on the left needle, knit into the first stitch, then pull both stitches onto the right needle, stitch complete. 
  • Left Twist (LT): Knit through the back loop of the 2nd st, keep the stitch on the left needle, knit in the first stitch, then pull both stitches onto the right needle, stitch complete. 
Notes:

Copyright Julia Schwartz. Do not reproduce, copy, distribute, or sell this pattern without permission of the designer. This pattern must not be translated, reproduced, or circulated in another language without prior consent. If you have questions about this pattern please contact Julia.diligence@gmail.com.


Using a provisional Cast On, cast on 20 loops

Row 1 and every odd row:
 K4, p12, k4
Row 2: K8, RT, LT, k8
Row 4: K7, RT, k2, LT, k7 
Row 6: K6, (RT) x 2, (LT) x 2, k6 
Row 8: K5, (RT) x 2, k2, (LT) x 2, k5 
Row 10: K4, (RT) x 2, k4, (LT) x 2, k4 
Row 12: K4, (LT) x 2, k4, (RT) x 2, k4 
Row 14: K5, (LT) x 2, k2, (RT) x 2, k5 
Row 16: K6, (LT) x 2, (RT) x 2, k6 
Row 18: K7, LT, k2, RT, k7 
Row 20: K8, LT, RT, k8 

Rows 21-140 or until your desired circumference: Repeat rows 1-20

At the end of row 140, take out the provisional cast on and put your loops back on the needle as to do the Kitchener stitch

Kitchener stitch the two ends together. 

Finish off. Weave in your ends. 

If You would like to continue making the hat you can purchase it here through my Ravelry store. 

More Knitting Patterns You Will Love.

The Wellsley Cowl

Swift Chevron Hat


Pin for Later!


Wednesday, August 15, 2018

Wellsley Cowl

A Free Knitting Pattern


The Wellsley Hat now has its best friend at its side. When designing these two best friends I actually started with the cowl, and made the hat second. I asked my Instagram friends which pattern they wanted to see first and they said the Hat so that is what I started with.

I feel that the Cowl is a little bit easier than the hat because you are not picking up new stitches anywhere. The thing that I love about this pattern is the versatility. It would be pretty easy to make it bigger or smaller to meet your needs, and again the yarn is just so super soft.

I usually have my patterns ready on Monday/ Tuesday but a lot of crazy has happened this week, and we are moving back to the States at the end of the month. I wanted to get this pattern out to you sooner rather than later so I can concentrate on getting everything packed up for the move. In the next coming weeks I'll be able to share more with you about where my family is headed and what we will be up to, but I'm excited to be starting this next chapter.


Where can I get this Pattern?


This is a free knitting pattern found right here on Designs by Diligence. Just keep scrolling down to read the pattern. If you would like to purchase an ads free, printer friendly PDF you can through my Ravelry Pattern Store for $3.00.
<-------->buy now <--------->
The paid pattern will include everything in this blog post plus charts to help you complete this pattern.

Don't forget to check out the companion hat pattern here!

Stay Connected!

If you like this pattern be sure to subscribe to Designs by Diligence to get notified when new patterns come out. The only time you will get an email is when a new post happens on the blog, usually on Tuesday.

You can also follow me through my social media sites. I love sharing sneak peeks, wips, and fiber arts news and projects.
Facebook

Instagram

Pinterest


Pattern


Designer: Julia Schwartz
Yarn: Any worsted weight yarn. Model used Lion brand Yarn: Heartland color Sequoia 100% acrylic 142 g/ 230m 4 medium
Needles: 9/ 5.5mm
Notions: yarn needle for sewing up the seams
Gauge: 16 stitches and 22 rows = 4 inches
Size:
Stitches used: k, p, RT, LT, k2tog, k2togb ( knit 2 together though the back loop), PM (place marker)
Special Stitches:
  • Right Twist (RT): Knit 2 together keeping both stitches on the left needle, knit into the first stitch, then pull both stitches onto the right needle, stitch complete. 
  • Left Twist (LT): Knit through the back loop of the 2nd st, keep the stitch on the left needle, knit in the first stitch, then pull both stitches onto the right needle, stitch complete. 

Notes: The k4 at the front and back of each row is the ribbing of the cowl.

****Edit 10/10/2018 Row 1 was corrected to say K4, p26, k4****

Copyright
Julia Schwartz. Do not reproduce, copy, distribute, or sell this pattern without permission of the designer. This pattern must not be translated, reproduced, or circulated in another language without prior consent. If you have questions about this pattern please contact Julia.diligence@gmail.com.


Instructions

Cast on 34 sts using the long tail cast on.

Row 1 and every odd numbered row: K4, p26, k4
Row 2: k4, k, (LT) x 2, k6, RT, LT, k6, (RT) x 2, k, k4 Row 4: k4, k2, (LT) x 2, k4, RT, k2, LT, k4, (RT) x 2, k2, k4 Row 6: k4, k3, (LT) x 2, k2, (RT) x 2, (LT) x 2, k2, (RT) x 2, k3, k4 Row 8: k4, k4, (LT) x 2, (RT) x 2, k2, (LT) x 2, (RT) x 2, k4, k4 Row 10: k4, k5, LT, (RT) x 2, k4, (LT) x 2, RT, k5, k4 Row 12: k4, k6, (RT) x 2, k6, (LT) x 2, k6, k4 Row 14: k4, k5, (RT) x 2, LT, k4, RT, (LT) x 2, k5, k4 Row 16: k4, k4, (RT) x 2, (LT) x 2, k2, (RT) x 2, (LT) x 2, k4, k4 Row 18: k4, k3, (RT) x 2, k2, (LT) x 2, (RT) x 2, k2, (LT) x 2, k3, k4 Row 20: k4, k2, (RT) x 2, k4, LT, k2, RT, k4, (LT) x 2, k2, k4 Row 22: k4, k, (RT) x 2, k6, LT, RT, k6, (LT) x 2, k, k4 Row 24: k4, (RT) x 2, k18, (LT) x 2, k4 Row 26: k4, (LT) x 2, k18, (RT) x 2, k4

Repeat rows 1- 26 for 4 repeats

Row 105: k4, p, k4 Row 106: k4, k, (LT) x 2, k6, RT, LT, k6, (RT) x 2, k, k4 Row 108: k4, k2, (LT) x 2, k4, RT, k2, LT, k4, (RT) x 2, k2, k4 Row 110: k4, k3, (LT) x 2, k2, (RT) x 2, (LT) x 2, k2, (RT) x 2, k3, k4 Row 112: k4, k4, (LT) x 2, (RT) x 2, k2, (LT) x 2, (RT) x 2, k4, k4 Row 114: k4, k5, LT, (RT) x 2, k4, (LT) x 2, RT, k5, k4 Row 116: k4, k6, (RT) x 2, k6, (LT) x 2, k6, k4 Row 118: k4, k5, (RT) x 2, LT, k4, RT, (LT) x 2, k5, k4 Row 120: k4, k4, (RT) x 2, (LT) x 2, k2, (RT) x 2, (LT) x 2, k4, k4 Row 122: k4, k3, (RT) x 2, k2, (LT) x 2, (RT) x 2, k2, (LT) x 2, k3, k4 Row 124: k4, k2, (RT) x 2, k4, LT, k2, RT, k4, (LT) x 2, k2, k4 Row 126: k4, k, (RT) x 2, k6, LT, RT, k6, (LT) x 2, k, k4 Row 128: k4, (RT) x 2, k18, (LT) x 2, k4 Row 130: k4, k2togb, LT, k18, RT, k2tog, k4 Row 132: k4, k2togb, LT, k16, RT, k2tog, k4 Row 134: k4, k2togb, LT, k14, RT, k2tog, k4 Row 136: k4, k2togb, LT, k12, RT, k2tog, k4 Row 138: k4, k2togb, LT, k10, RT, k2tog, k4 Row 140: k4, k2togb, LT, k8, RT, k2tog, k4 Row 142: k4, k2togb, LT, k6, RT, k2tog, k4 Row 144: k4, k2togb, LT, k4, RT, k2tog, k4 Row 146: k4, k2togb, LT, k2, RT, k2tog, k4 Row 148: k4, k2togb, LT, RT, k2tog, k4

Row 149: k Row 150: k4, k2togb, k2tog, k4
Row 151: k Row 152: k Row 153: k
Bind off.
Seam up your ends so that the triangle piece is overlapping starting at row 128.
Sew the under side of the long side and Sew the top side of the short side.
Add a button.
Weave in any extra ends.


More Knitting Patterns You Will Love


Swift Swirl Cowl


Waterways Cowl

Pin for Later!


Monday, June 18, 2018

Moondoggie Bag

A free knitting pattern


For the longest time I have been wanting to make a knit version of the Copy Cat Bag. I have it ready for today. So I will need to explain the name a little. I wanted the name to go along with the crocheted version, I thought whats the opposite of cats, (well dogs), and I liked how the colors I chose reminded me of the beach, which reminded me about the movie Gidget and her man was named Moondoggie. So there you go; that was my thought process on the name for the bag.

I changed a few things. The biggest being that I used worsted cotton yarn for the bag instead of Lustersheen. With the larger yarn, it's able to be worked up quickly over the weekend.

This bag is the perfect size to throw your kindle or tablet in and small project to go relax at the park or beach to find your own Moondoggie. I lined my bag and added handles. All of these things are totally optional. Try different things to really make it your own.


Where can I get this Pattern?


This is a free knitting pattern found right here on Designs by Diligence. Just keep scrolling down to read the pattern. If you would like to purchase an ads free, printer friendly PDF you can through my Ravelry Pattern Store for $3.00.
<----->buy now<--------->

Designer: Julia Schwartz
Yarn: Bernat HandiCrafter 100% cotton 2 skeins colors coral and navy
Needles: size 9 (6.0 mm), I switched to a size 7 (4.5 mm) 24 inch circular needle for the brim of the bag.
Notions: yarn needle to weave in your ends, liner fabric, fabric for handles, thread, sewing machine
Size: 10 in by 10 in
Gauge: 15 st for 4 in and 20 rows
Stitch terms: 
k: knit, p:purl, kfb: knit front and back 

Copyright:
Julia Schwartz. Do not reproduce, copy, distribute, or sell this pattern without permission of the designer. This pattern must not be translated, reproduced, or circulated in another language without prior consent. If you have questions about this pattern please contact me through e-mail.


Instructions 

Middle of bag

Cast on 80 stitches using your favorite cast on method

Row 1: With color A, p (80 sts)
Row 2: k (80 sts)
Rows 3-8: repeat rows 1 and 2
Rows 9-16: Change to color B, continue repeats rows 1 and 2.
Rows 17-24: Change to color A, continue repeating rows 1 and 2.
Bind off.

Sides of bag (make 2)


Cast on 12 stitches using your favorite cast on method
Row 1: Wtih color A, p (12 sts)
Row 2: k 3, kfb, k 2, kfb, k3 (14 sts)
Row 3: p
Row 4: k4, kfb, k2, kfb, k4 (16 sts)
Row 5: p
Row 6: k5, kfb, k2, kfb, k5 (18 sts)
Row 7: p
Row 8: k6, kfb, k2, kfb, k6 (20 sts)
Row 9: switch to color B, p
Row 10: K7, kfb, k2, kfb, k7 (22 sts)
Row 11: p
Row 12: k (22 sts)
Row 13- 16: repeat rows 11 and 12
Rows 17-24: change to color A, repeat rows 11 and 12
Rows 25- 32: Change to color B, repeat rows 11 and 12
Rows 33-40: Change to color A, repeat rows 11 and 12
Rows 41-48: Change to color B, repeat rows 11 and 12
Bind off


Sewing your bag together. 

  • First fold the sides in half  long ways so stitch 1 is touching stitch 12. Wip stitch row 1 together. Repeat on the other side piece.  
  • Then fold your middle piece together to find the middle stitch and mark it.
  • Put one side piece and middle piece together with the knit sides facing together. 
  • Wip stitch them together, it won't be stitch to stitch for every color change you will need to skip a stitch for it to come out even. 
  • Repeat on the other side. 
When all the seams are sewn together, add a Rim
Pick up each stitch around the bag opening with color A using circular needles, knit 5 rounds and bind off.
Weave in your ends.

Add the lining and handles to your bag.
Go enjoy the beach!

Stay Connected!

If you like this pattern be sure to subscribe to Designs by Diligence to get notified when new patterns come out. The only time you will get an email is when a new post happens on the blog, usually on Tuesday.

You can also follow me through my social media sites. I love sharing sneak peeks, wips, and fiber arts news and projects.

Facebook
Instagram
Pinterest

More Knitting Patterns You Will Love.

Come This way Purse

Swift Swirl Cowl 

Pin for Later!


Tuesday, April 24, 2018

Come This Way Purse

A Free Knitting Pattern


I have to tell you a story. I thought I was designing a cowl, and my husband came home from school and looked at what I was making and said, "Oh, are you making a bag?" I looked down at what I was making, and said, "yep, I guess I am." And that is how this purse was born. He saw the vision before I did. I love that he did and I love all the texture that is on this bag.

This Purse was a quick project. I was able to make it in a weekend. Even though there is a lot happening, the stitches are easy to master. I added a zipper and lined the purse. At the end of the post I have a link to another post showing how I did that. I also made my own handles for the purse, but I think it would look fabulous with re-purposed handles from a bag you are not using any more. 


Where can I get this Pattern?

This is a free knitting pattern found right here on Designs by Diligence. Just keep scrolling down to read the pattern. If you would like to purchase an ads free, printer friendly PDF you can through my Ravelry Pattern Store for $3.00. As a bonus for purchasing the pattern you will receive a chart and key along with the written pattern.

<---------->buy now <---------->

Save this Pattern to your favorites!
come this way purse


Pattern

Designer: Julia Schwartz
Yarn: Any worsted weight yarn. Model used Patons yarn Canadiana Color Fool's gold 100% acrylic 100g 187m
Needles: 7/ 4.5mm
Notions: yarn needle for sewing up the bag, (lining, zipper, handles, sewing machine, and thread optional)
Gauge: 20 sts and 26 rows
Size: 12 by 10 in
Stitches used: k, p, RT, LT, lateral braid
Special Stitches: 

  • Right Twist (RT): Knit 2 together keeping both stitches on the left needle, knit into the first stitch, then pull both stitches onto the right needle, stitch complete.
  • Left Twist (LT): Knit through the back loop of the 2nd st, keep the stitch on the left needle, knit in the first stitch, then pull both stitches onto the right needle, stitch complete.
  • Lateral braid: Knit through the back  loop of the 2nd st, keep the stitch on the left needle, knit in the first stitch, then pull both stitches onto the right needle, slip the last stitch made back onto the left needle, continue repeating the stitch all the way across the row.  

Copyright
Julia Schwartz. Do not reproduce, copy, distribute, or sell this pattern without permission of the designer. This pattern must not be translated, reproduced, or circulated in another language without prior consent. If you have questions about this pattern please contact Julia.diligence@gmail.com.


Instructions (repeat 2 times for both sides of the purse):


Cast on 40 st using your favorite cast on
Row 1: (K, P) repeat (to) all 40 sts
Row 2 and 3: (P, K) repeat (to) all 40 sts
Row 4: (k, p) repeat (to) all 40 sts
At the end of row 4 cast on 5 sts
Row 5: (p, k) repeat (to) all 45 sts
At the end of row 5 cast on 5 sts
Row 6 and 7: (k,p) repeat (to) all 50 sts
Row 8: (p, k) repeat (to) all 50 sts 
Row 9: Make a lateral braid across the row
Row 10: p
Row 11: (K 3, LT, ) repeat (to) 8 times, k 5
Row 12: p
Row 13: k 4, LT, (K3, LT) repeat (to) 7 times, k 4
Row 14: p
Row 15: K 5, LT, (K3, LT) repeat (to) 7 times, k 3
Row 16: p
Row 17: K5, RT, (K3, RT) repeat (to) 7 times, k3
Row 18: p
Row 19:  k 4, RT, (K3, RT) repeat (to) 7 times, k 4
Row 20: p
Row 21: (K 3, RT, ) repeat (to) 8 times, k 5
Row 22: p
Row 23: Make a lateral braid across the row
Row 24 and 25: (p, k) repeat (to) all 50 sts
Row 26 and 27: (K, p) repeat (to) all 50 sts
Row 28: (p, k) repeat (to) all 50 sts
Row 29: Make a lateral braid across the row
Row 30:P
Row 31: K5, RT, (K3, RT) repeat (to) 7 times, k3
Row 32: p
Row 33:  k 4, RT, (K3, RT) repeat (to) 7 times, k 4
Row 34: p
Row 35: (K 3, RT) repeat (to) 8 times, k 5
Row 36: p
Row 37: (K 3, LT) repeat (to) 8 times, k 5
Row 38: p
Row 39: k 4, LT, (K3, LT) repeat (to) 7 times, k 4
Row 40: p
Row 41: K 5, LT, (K3, LT) repeat (to) 7 times, k 3
Row 42: p
Row 43: Make a lateral braid across the row
Row 44 and 45: (p, k) repeat (to) all 50 sts
Row 46 and 47: (K, p) repeat (to) all 50 sts
Row 48: (p, k) repeat (to) all 50 sts
Row 49: Make a lateral braid across the row
Row 50: P
Cast off. 
Weave in your ends. 
Wip stitch the 2 sides and bottom together, or Follow This Link for adding a zipper and liner to your bag. 


Stay Connected

If you like this pattern be sure to subscribe to Designs by Diligence to get notified when new patterns come out. The only time you will get an email is when a new post happens on the blog, usually on Tuesday.

You can also follow me through my social media sites. I love sharing sneak peeks, wips, and fiber arts news and projects.

Facebook
Instagram
Pinterest


More Patterns You Would Love

Swift Swirl Cowl

Baby Helix Hat


Pin for Later!


Wednesday, December 13, 2017

Douglas Fir Dishcloth

A Free Knitting Pattern 


This will be my last Holiday Gift Pattern for 2017. It's crazy that 2018 is so close upon us. Almost 20 years ago we were going crazy over Y2K. I'm so happy the clocks kept going.

Do you have a favorite Christmas tree story? When I was a little girl my family liked going to this out in the middle of nowhere tree farm to pick out our tree. I remember the first year we did it. We totally miss judged the length of the tree. It was gigantic, and my dad had to spend quite a while trimming the tree to get it to fit in our house. The next year we were wiser and picked out a much smaller one. There are also lots of stories my sister could tell of the cat knocking the tree over on her.

I have a little pattern today to bring back some of those memories. I say little, but this dishcloth is bigger than what I usually make them, because I like little dishcloths. Other people will probably say it is just right at 7 1/2 by 7 1/2


Where can I get this pattern

This is a free Pattern right here on the blog. Just keep scrolling down to find the pattern. If you would like an ads free, printer friendly PDF version I have them for sale in my Ravelry Shop for 3.00.
<----------->buy now <------------>
If you like this pattern be sure to subscribe to Designs by Diligence to get notified when new patterns come out. The only time you will get an email is when a new post happens on the blog, usually on Tuesday.

You can also follow me through my social media sites. I love sharing sneak peeks, wips, and fiber arts news and projects.
Facebook
Instagram
Pinterest 

Douglas Fir Dishcloth

Designer: Julia Schwartz
Yarn: Bernat HandiCrafter 100% cotton color Sonoma Print
Needles: size 7 (4.5mm)
Notions: yarn needle to weave in your ends
Size: 7 1/2 by 7 1/2 inches
Gauge: 20 st for 4 in and 26 rows
Stitch terms: 
k: knit, p:purl, k2tog: knit 2 together, bl: back loop, m1: make 1, p wise: purl wise, p2tog: purl 2 together,
Notes: 
All of the rows start with a seed st border, sometimes you will see a (K 2, k,p,k,p) you wil knit 3 in this instance. It is just my way of differentiating the boarder from the rest of the pattern. I have highlighted the rows that there will be multiple repeats for easy finding. 
Copyright:
Julia Schwartz. Do not reproduce, copy, distribute, or sell this pattern without permission of the designer. This pattern must not be translated, reproduced, or circulated in another language without prior consent. If you have questions about this pattern please contact me through e-mail.


Instructions


Cast on 32 sts ( I used the twisted German Long tail)

Row 1: (P, k) repeat (to)
Row 2: (K, p) Repeat (to)
Row 3-6: Repeat row 1 and 2
Row 7: P, k, p, k, k 24, p,k,p,k
Row 8: K, p, k,p, k 24, k, p, k, p
Row 9- 10: Repeat row 7 and 8

Row 11: P, k, p, k, p 4, k 16, p 4, p, k, p, k

Row 12: Repeat row 8
Row 13: Repeat row 11

Row 14: k,p,k,p, k 4, p 16, k 4, k,p,k,p

Row 15: Repeat row 11
Row 16: Repeat 14

Row 17: p,k,p,k, p 4, place 4 stitches onto the cable needle, place cable needle behind work, k 4, k cable stitches, place next 4 st on cable needle, place cable needle in front of your work, k 4, k cable stitches, p 4, p,k,p,k

Row 18: Repeat row 14
Row 19: Repeat row 11
Row 20: Repeat row 14
Row 21: Repeat row 11
Row 22: Repeat row 14
Row 23: repeat row 17
Row 24: repeat row 14
Row 25: p,k,p,k, p 4, m 1 p wise, k2tog through bl, k 12, k2tog, M1 p wise, p 4, p,k,p,k
Row 26: k,p,k,p, k 5, p 14, k 5, k,p,k,p
Row 27: p,k,p,k, p 5, m1 p wise, k2tog through bl, k 10, M1 p wise, p 5, p,k,p,k
Row 28: k,p,k,p, k 6, p 12, k 6, k,p,k,p
Row 29: P,k,p,k, p 6,  place 3 stitches onto the cable needle, place cable needle behind work, k 3, k cable stitches, place next 3 st on cable needle, place cable needle in front of your work, k 3, k cable stitches, p 6, p,k,p,k

Row 30: repeat row 28
Row 31: P,k,p,k, p 6, m1 p wise, k2tog through bl, k 8, k2tog, m1 p wise, p,k,p,k
Row 32: K,p,k,p, k 7, p 10, k 7, k,p,k,p
Row 33: p,k,p,k, p 7, m1 p wise, k2tog through bl, k 6, k2tog, m1 p wise, p 6, p,k,p,k
Row 34: K,p,k,p, k 8, p 8, k 8, 
Row 35: P,k,p,k, p 8,  place 2 stitches onto the cable needle, place cable needle behind work, k 2, k cable stitches, place next 2 st on cable needle, place cable needle in front of your work, k 2, k cable stitches, p 8, p,k,p,k

Row 36: Repeat row 34
Row 37: P, k, p,k, p 8, m1 p wise, k2tog through bl, k 4, k2tog, M1 p wise, p 8, p,k,p,k
Row 38: K,p,k,p, k 9, m1, p2tog, p 2, p2tog, m1, k 9, k,p,k,p
Row 39: P,k,p,k, p 10,  place 2 stitches onto the cable needle, place cable needle behind work, k 2, k cable stitches, p 10, p,k,p,k
Row 40: k,p,k,p k 10, m1, p2tog, p2tog, m1, k 10, k,p,k,p
Row 41: P,k,p,k, p 24, p,k,p,k
Row 42: K,p,k,p, k 24, k,p,k,p
Row 43- 47: repeat row 1 and 2
cast off. weave in your ends.

More Patterns You Will Love

Learner's Curve Dishcloth

Swift Chevron Hat


Monday, November 13, 2017

Crochet and Knit Christmas Tags

A Free Crochet and Knitting Pattern


I love wrapping presents. It's one of my favorite things to do around the holidays. There is just something about folding the paper and finding creative ideas to make them look festive and beautiful at the same time. There are a lot of options for these.


I have a knit and crochet version for whatever craft you prefer. You can design the tag however you like. You could choose different holiday shapes like me, or you could embroider the monogram of the person you are giving the present to. Another idea would be to number them for an advent present calendar. Whatever you chose they will last for as long as you want them and they will add a personal touch to any gift.

Where can I get this pattern?

These are free patterns. Just keep scrolling down to find these patterns. These are also available for a free PDF download through my Ravelry Store. It's my way of saying Merry Christmas to you. Be sure to check out my other patterns in the shop if you like what you see.
 <------------>download now<------------>


Crochet Pattern


Yarn: worsted cotton yarn
Hook: H/8 5mm
Notions: tapestry needle, embroidery thread
Size: 4 by 3 inches
Gauge: 13 sc and 14 rows
Copyright:
Julia Schwartz. Do not reproduce, copy, distribute, or sell this pattern without permission of the designer. This pattern must not be translated, reproduced, or circulated in another language without prior consent. If you have questions about this pattern please contact Julia.diligence@gmail.com.

Instructions

Row 1: Ch 9, 1 sc in 2nd ch from hook, sc in each ch across. (8 sc)
Row 2: Ch 1, turn, sc in each sc. (8 sc)
Row 3- 9: Repeat row 2. (8 sc)
Row 10: Ch 1, turn, sc2tog, sc in the next 4 sc, sc2tog. (6 st)
Row 11: Ch 1, turn, sc2tog, sc in the next 2 sc, sc2tog. (4 st)
Row 12: Ch 1, turn sc in each st. (4 st)
Edging: Ch 1, sc in each stitch around, ch 1 at every corner.

Finish off
Weave in your ends.

For embroidery, use all 6 strands of cotton floss to add a simple design to your tags.

Optional Grommet:  Follow the instructions on the package to insert the grommet in between the stitches of rows 7 and 9.

Knitting Pattern


Yarn: Worsted cotton yarn
Needles: 4.5 mm (U.S. 7)
Notions: tapestry needle, embroidery thread
Size: 4 by 3 inches
Gauge: 20 sts and 26 rows 
Notes: I tried to make his pattern as beginner friendly as possible. so if you like to keep your edges extra crisp and flat with a beg. sl st and end with a purl Go For It.
Copyright:
Julia Schwartz. Do not reproduce, copy, distribute, or sell this pattern without permission of the designer. This pattern must not be translated, reproduced, or circulated in another language without prior consent. If you have questions about this pattern please contact Julia.diligence@gmail.com.

Instructions

Cast on 12 st. 
Row 1: p 12
Row 2: k 12
Row 3- 14: repeat rows 1 and 2
Row 15: p 12
Row 16: k 1, k2tog through back loop, k 6, k2tog, k 1
Row 17: p 10
Row 18: k 1, k2tog through the back loop, k 4, k2tog, k 1
Row 19: p 8
Row 20: bind off

Finish off
Weave in your ends.

For embroidery, use all 6 strands of cotton floss to add a simple design to your tags.

Optional Grommet:  Follow the instructions on the package to insert the grommet in between the stitches of rows 14 and 16.


Subscribe!

If you liked these patterns and you would like to keep seeing more. Subscribe to Designs by Diligence emails. You will only get an email when there is a new post up on the blog.


You can also follow me through my social media sites to find updates, sneak peeks, promo codes, and news about fiber arts around the world.


More Patterns You Will Love:


Crochet Poinsettia Jar Cozy

Knit Basket Full of Posies