Monday, October 22, 2018

Diamond Dimensions Hat and Ear Warmer

A Free and Paid Knitting Pattern


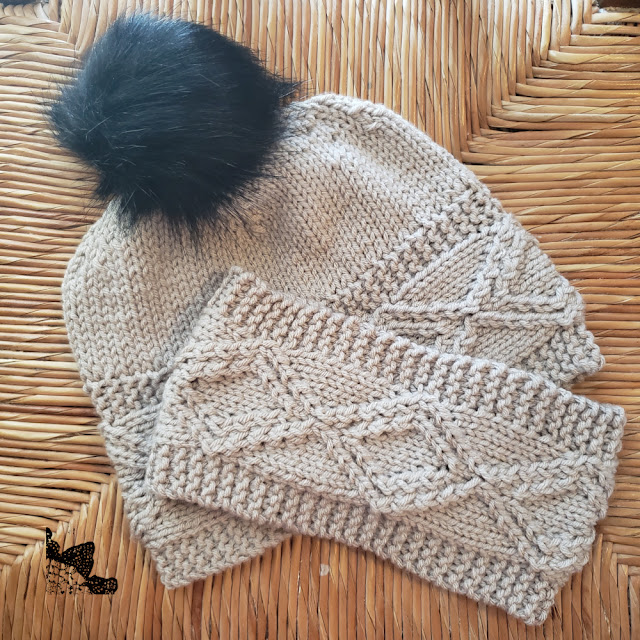
I have two new knitting patterns for you today. I wanted to make a similar hat to my Wellsley Hat, but without the extra seaming. This time the texture pattern is a little bit different and the band is kitchener stitched together for a seamless finish. Below I will have the free pattern for the ear warmer and there will be a chance to buy the hat pattern through my Ravelry Store. 

While I was working on this pattern I thought it would pair really well with my Diamond Dimensions Neck Warmer, so that is why you might recognize the name. They would be the perfect set to gift together.

This time I used Patons Canadiana Yarn for the ear warmer and hat. This is some of my favorite yarn, I have never been unhappy with it. I wore this hat the other day, and I forgot the hat was even on. This yarn is just so comfortable and soft.

**Can I just say one quick thing about the Wellsley Hat? It's been up on the blog for 2 months and it is already my top 7th pattern on the blog out of almost 7 years of designs. Thanks for all of your love on this pattern.** 


Where can I get this Pattern?


This is a free knitting pattern found right here on Designs by Diligence. Just keep scrolling down to read the pattern. If you would like to purchase an ads free, printer friendly PDF you can through my Ravelry Pattern Store for $3.00.
<-------->buy now <--------->

When you purchase this pattern you will get the pattern for the Ear Warmer, Hat, and charts to help you create these stunning projects. 


Stay Connected!

If you like this pattern be sure to subscribe to Designs by Diligence to get notified when new patterns come out. The only time you will get an email is when a new post happens on the blog, usually on Tuesday.

You can also follow me through my social media sites. I love sharing sneak peeks, wips, and fiber arts news and projects.
Facebook

Instagram

Pinterest


Designer: Julia Schwartz

Yarn: Any worsted weight yarn. Model used Patons Canadiana 100% acrylic, 100 g / 3.5 oz, 187 m / 205 yds. (Hat uses 100 yds.).

Needles: 7/ 4.5mm

Notions: Yarn needle for weaving in your ends

Gauge: 16 stitches and 22 rows = 4 inches Size: 21 inch circumference (stretches to fit an adult head. My head is 23 and it is perfect)

Stitches used: k (Knit), p (purl), RT (Right Twist), LT (Left Twist), k2tog (knit 2 together), k2togb (knit 2 together though the back loop), PM (place marker)
Special Stitches:

  • Right Twist (RT): Knit 2 together keeping both stitches on the left needle, knit into the first stitch, then pull both stitches onto the right needle, stitch complete. 
  • Left Twist (LT): Knit through the back loop of the 2nd st, keep the stitch on the left needle, knit in the first stitch, then pull both stitches onto the right needle, stitch complete. 
Notes:

Copyright Julia Schwartz. Do not reproduce, copy, distribute, or sell this pattern without permission of the designer. This pattern must not be translated, reproduced, or circulated in another language without prior consent. If you have questions about this pattern please contact Julia.diligence@gmail.com.


Using a provisional Cast On, cast on 20 loops

Row 1 and every odd row:
 K4, p12, k4
Row 2: K8, RT, LT, k8
Row 4: K7, RT, k2, LT, k7 
Row 6: K6, (RT) x 2, (LT) x 2, k6 
Row 8: K5, (RT) x 2, k2, (LT) x 2, k5 
Row 10: K4, (RT) x 2, k4, (LT) x 2, k4 
Row 12: K4, (LT) x 2, k4, (RT) x 2, k4 
Row 14: K5, (LT) x 2, k2, (RT) x 2, k5 
Row 16: K6, (LT) x 2, (RT) x 2, k6 
Row 18: K7, LT, k2, RT, k7 
Row 20: K8, LT, RT, k8 

Rows 21-140 or until your desired circumference: Repeat rows 1-20

At the end of row 140, take out the provisional cast on and put your loops back on the needle as to do the Kitchener stitch

Kitchener stitch the two ends together. 

Finish off. Weave in your ends. 

If You would like to continue making the hat you can purchase it here through my Ravelry store. 

More Knitting Patterns You Will Love.

The Wellsley Cowl

Swift Chevron Hat


Pin for Later!


Monday, October 1, 2018

Becca Kid's Sweater


A Free Crochet Pattern 


A while back did any of you take advantage of the Lionbrand mystery boxes? I did. I got one of the light boxes. When I saw the ice cream yarn I knew just what I wanted to do with it. Make a sweater for my daughter. I ended up having just the right amount of yarn, 3 skeins. The speckles are just the right amount to make it more interesting. I always love something with a bit of texture, and I think this stitch pattern is perfect.

I wanted a sweater that was really easy to construct, and seamless on the sides. The only seams in this whole sweater are at the shoulders, and the top of the hood. Because there is not a lot of seaming this sweater works up quick and it is easy to adjust the sizing to just how you want it.

I also want to remind you that there is a stitch tutorial for the stitch used in this sweater you can find it here: lateral braid stitch.


Where can I get this Pattern?


This is a free crochet pattern found right here on Designs by Diligence. Just keep scrolling down to read the pattern. If you would like to purchase an ads free, printer friendly PDF you can through my Ravelry Pattern Store for $3.00
<---------->buy now<---------->
When you purchase this pattern You will get 3 sizes (4-6, 6-8, and 8-10). The blog post below only has the 8 -10 size.

Stay Connected!

If you like this pattern be sure to subscribe to Designs by Diligence to get notified when new patterns come out. The only time you will get an email is when a new post happens on the blog, usually on Tuesday.

You can also follow me through my social media sites. I love sharing sneak peeks, wips, and fiber arts news and projects.
Facebook

Instagram

Pinterest


Designer: Julia Schwartz
Yarn: Lion Brand Ice cream yarn: 100% acrylic, 100g/ 3.5 oz, 390 yrd, 360m, 3 light, color sprinkles sherbet 304 (3 balls needed for size 8-10)
Hook: F/5 3.75mm
Notions: yarn needle
Size: youth large 8- 10 years (32 inch chest circumference, 21 inch length)
If you would like to purchase the small and medium sizes you can HERE!
<---->buy now<------>
Gauge: 15 dc X 8 rows equals 4 X 4 inches
Stitches Used: ch, dc, foundation dc, lateral braid stitch (I made a tutorial for the stitch, just follow the link), sc
Special stitches:
  •  Lateral braid stitch: yarn over, insert your hook right under the v of the stitch you just finished stitching into, and around the post of the next stitch. so it looks like you are straddling both "v's",
    yarn over, pull hook back through the stitches, yarn over, pull through 2 loops, yarn over, pull through 2 loops 

Notes: The pattern is worked from the bottom up.
Copyright:
Julia Schwartz. Do not reproduce, copy, distribute, or sell this pattern without permission of the designer. This pattern must not be translated, reproduced, or circulated in another language without prior consent. If you have questions about this pattern please contact Julia.diligence@gmail.com.


Pattern Instruction


Row 1 (wrong side): Make 119 foundation dc or ch 121, dc in 3rd ch from hook and in each ch for a total of 119 dc.
Row 2 (right side): Ch 3, (counts as first dc here and throughout), turn, 2 dc in the next st, {sk dc, 2 dc in next dc} repeat to last 3 dc, sk 1 dc, dc in each of the last 2 dc. (119 sts)
Row 3: Ch 3, turn, lateral braid st in each dc. (119 sts)
Row 4- Row 27: Repeat rows 2 and 3
do not finish off


Separation of sleeves for right front 

Row 28: Repeat row 2 for a total of 27 stitches. 
Rows 29- 37: Repeat rows 3 and 2. Finishing on a row 3. (27 stitches)
at the end of row 37 finish off. 

Separation of back

Row 28: With right side facing you, skip 5 sts on row 27, ch 3, 2 dc in the next st, {sk dc, 2 dc in next dc} repeat to last 3 dc, sk 1 dc, dc in each of the last 2 dc. (55 sts)

Rows 29-37: Repeat rows 3 and 2.  Finishing on a row 3. (55 stitches)
at the end of row 37 finish off. 

Separation for Left front

Row 28: With right side facing you, skip 5 sts on row 27, ch 3, 2 dc in the next st, {sk dc, 2 dc in next dc} repeat to last 3 dc, sk 1 dc, dc in each of the last 2 dc. (27 sts)

Rows 29-37: Repeat rows 3 and 2. Finishing on a row 3.  (27 stitches)
at the end of row 37 finish off.


Seam Shoulders

With front sides facing each other, fold the front sides in so that they are touching the back piece. See picture for reference. Sew together the top shoulder seams for 13 stitches on each side with a wip stitch.

Sweater Hood

Row 1: Starting with right side facing up, attach yarn at corner of row 37 and ch 3,  (counts as dc), 2 dc in the next st, {sk dc, 2 dc in next dc} repeat {to} t the last 3 sts, sk 1 dc, dc in each of the last 2 dc. (63 sts) Note: Depending on your seams your count might be a little different from mine, and that's okay just so long as you are ending with the last 3 sts the same.

Row 2(wrong side): Ch 3, turn, lateral braid st in each dc. (63 sts)

Row 3: Ch 3,turn, 2 dc in the next st, {sk 1 st, 2 dc in the next st, 1 dc in the next st, 2 dc in the next st} repeat 13 times, sk 1 st, 2 dc in the next st, 1 dc in the next 2 sts,  (77 sts)

Row 4: Repeat row 2 (77 sts)

Row 5: Ch 3, (counts as first dc here and throughout), turn, 2 dc in the next st, {sk dc, 2 dc in next dc} repeat to last 3 dc, sk 1 dc, dc in each of the last 2 dc. (77 sts)

Row 6- 23: Repeat row 4 and 5. (77 sts)

Row 24: Ch 1, turn, fold the row in half and working through both halves of the row, sl st in each of the stitches across for a total of 39 times.

Finish off.


Sleeves (same on both sides)

Row 1 (front side): Attach yarn in the 3rd stitch of the 5n open sts from row 27, ch 1, sc in the same stitch, sc in the next 2 sts, 2 sc in each post of the next 24 sts for a total of 48 sts, sc in the next 2 sts, sl st into the starting sc. (53 sts)

Row 2(wrong side): Ch 3, turn, lateral braid st in each dc, add a lateral braid stitch to starting ch, for an extra st. (54 sts)

Row 3: Ch 3, turn, dc in same sp, (sk 2 sts, 2 dc in the next st) repeat (to), {sk 1 st, 2 dc in the next st} repeat {to} 19 times, sk 2 sts, 2 dc in the next st, sk 2 sts, sl st into the starting st. (50 sts)

Row 4: Ch 3, turn, lateral braid st in each dc, sl st into starting st (50 sts)

Row 5: Ch 3, turn, dc in the same space, sk 2 sts, 2 dc in the next st, {sk 1 st, 2 dc in the next st} repeat {to} 20 times, sk 2 sts, sl st into starting st. (48 sts)

Row 6: Repeat row 4 (48 sts)

Row 7: Ch, 3, turn, dc in the same sp, {sk 1 st, 2 dc in the next st} repeat {to} 21 times, sk 1 st, sl st into starting st. (48 sts)

Row 8: Repeat row 4 (48 sts)

Row 9: Repeat row 7 (48 sts)

Row 10: Repeat row 4

Row 11: Ch 3, turn, dc in the same space, sk 2 sts, 2 dc in the next st, {sk 1 st, 2 dc in the next st} repeat {to} 19 times, sk 2 sts, sl st into starting st. (46 sts)

Row 12- 25: Repeat rows 6 and 7 (46 sts)

Row 26: Repeat row 4 (46 sts)

Row 27: Ch 3, turn, dc in the same space, sk 2 sts, 2 dc in the next st, {sk 1 st, 2 dc in the next st} repeat {to} 18 times, sk 2 sts, sl st into starting st. (44 sts)

Row 28: Repeat row 4 (44 sts)

Row 29: Ch 3, turn, dc in the same space, sk 2 sts, 2 dc in the next st, {sk 1 st, 2 dc in the next st} repeat {to} 17 times, sk 2 sts, sl st into starting st. (42 sts)

Row 30- 34: Repeat rows 6 and 7 (42 sts)

Rows 34- 38: Ch 1, turn, sc in same st and sc in each st, sl st into first st.

Finish off. Repeat on the second sleeve.

Sweater Edging Band

Round 1: Attach yarn at right front corner (with the front side facing up), ch 1, (sc, ch1,  sc) in same st, 2 sc in each st post around the right front, hood and left front, (sc, ch 1, sc) in the corner st, 1 sc in each st of beginning row, sl st in beg. sc.

Round 2-5: Sc in each sc, (sc, ch 1, sc) in each ch st.

Finish off. Weave in your ends.

More Crochet Patterns You Will Love


vintage nursery blanket

girl power backpack

Pin for Later!