Monday, May 14, 2018

The Ultimate List of Crochet Scrapghan Patterns

A round-Up by Designs by Diligence


I love scrapghans. I've even designed a few of them myself. I wanted to have them all in one place, and I thought why not add a whole bunch more to the list. Some of these blankets I have not made, some of them I have. Most of the patterns listed are free, but a few of them are paid patterns. I had a lot of fun making this list. I hope you find a new favorite!

Stay Connected

Are you new around here? There are great ways to stay connected. If you like this round-up be sure to subscribe to Designs by Diligence to get notified when new patterns and posts come out. The only time you will get an email is when a new post happens on the blog, usually on Tuesday.

You can also follow me through my social media sites. I love sharing sneak peeks, wips, and fiber arts news and projects.

Facebook
Instagram
Pinterest

The Ultimate List!


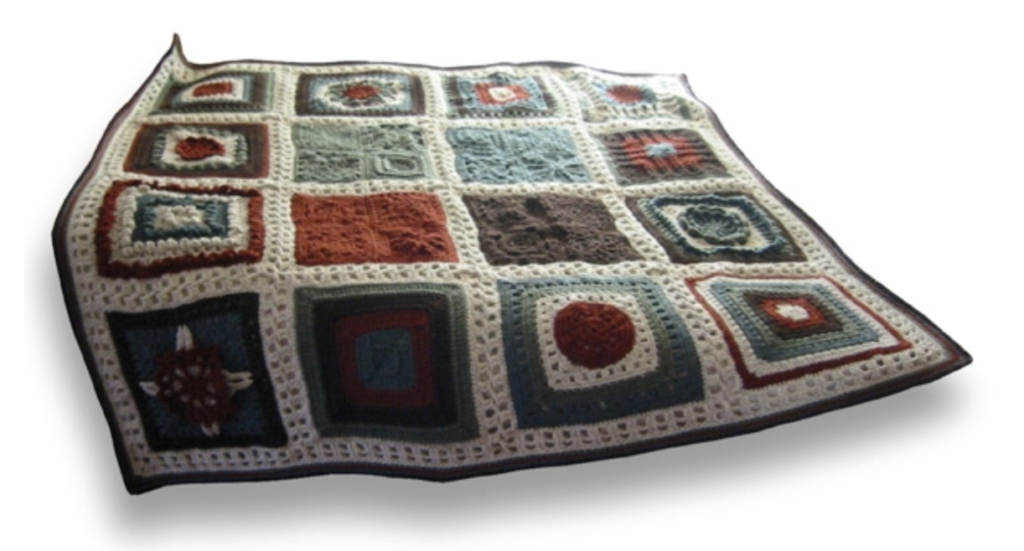
Box of Color 12 in square blanket 
By Fiber Flux
I love that this one is so simple, but it is so much better with all the colors.


Crochet Cable Hexagon
By mypicot.com
This one is just a stunning show stopper.


Modern Chrysanthemum Throw 
By Designs by Diligence
This is my newest Scrapghan. I try and make up a new one every year.


The Icicle Granny Square
By the Slippin Stitch
Who knew that by just changing the granny square just a little could make the whole pattern pop!

Crochet Flower in the Square Granny
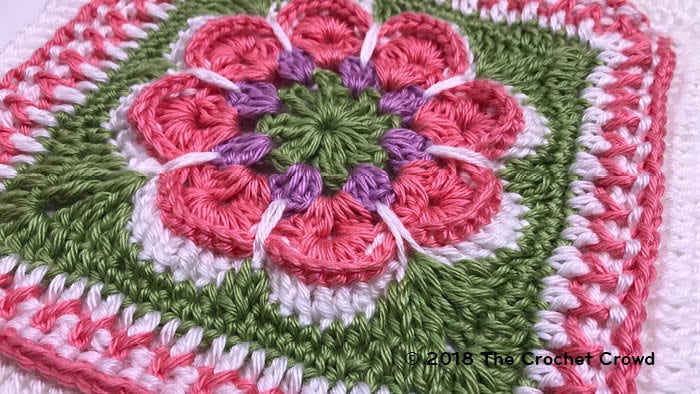
Crochet Flower in the Granny Square 
By the Crochet Crowd
Mickey always has a great eye for detail and this square has a lot!


Colorful Overlay Square
By Knit and Crochet blog
I always love all the color that Tuula puts into her designs. This square has always been a favorite of mine.


The colors of Sunshine Scrapghan 
By Designs By Diligence
I made this pattern years ago. I keep telling myself that I'm going to update the colors on it. I just need more time.
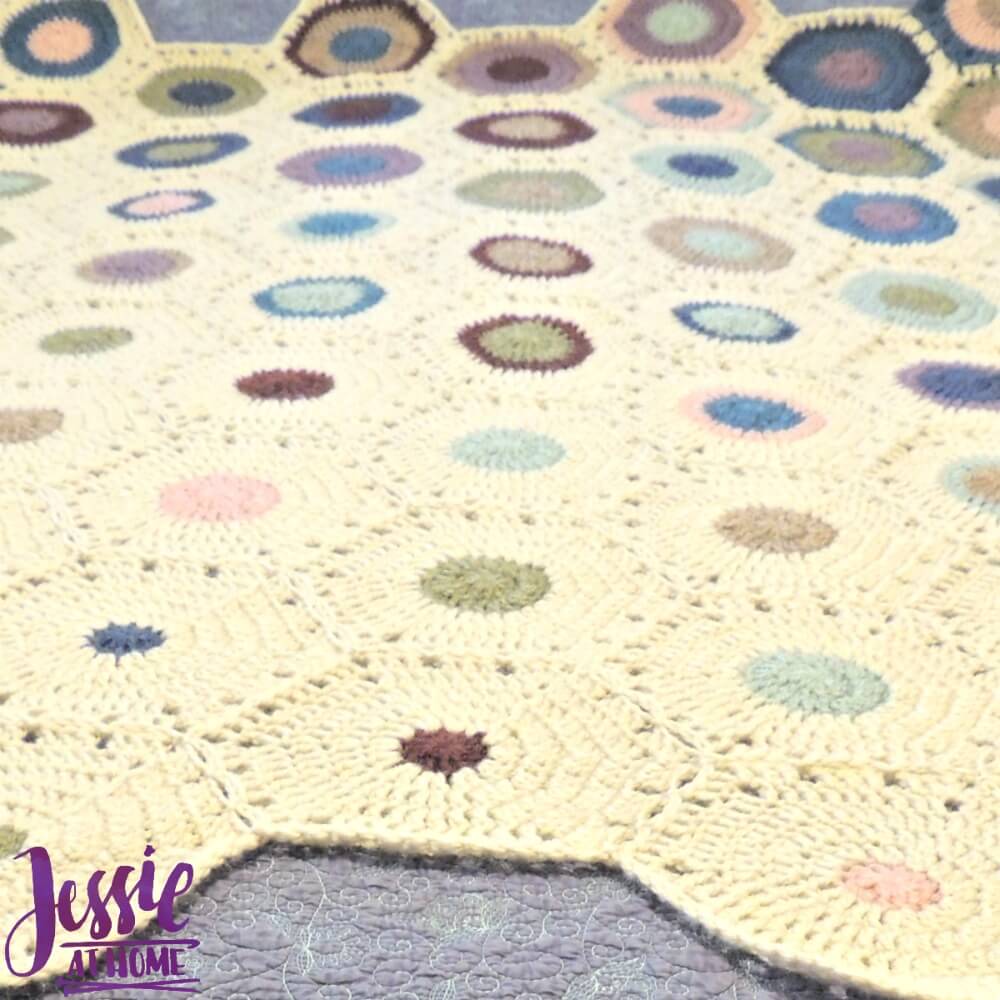

Hexagon Fade Crochet Pattern by Jessie At Home - 2
Hexagon Fade 
By Jessie at Home
This one just looks so modern. You can use the littlest of scraps on this one and it would still look great.


Scrap Log Cabin
By Annie's Catalog 
You can never go wrong with a traditional pattern.


In a Flash Mitered Corners Blanket 
By Designs By Diligence
This was my take on combining the ten stitch blanket with the log cabin blanket with the mitered square blanket.


Vintage Wobble Afghan :: free #crochet pattern on moogly
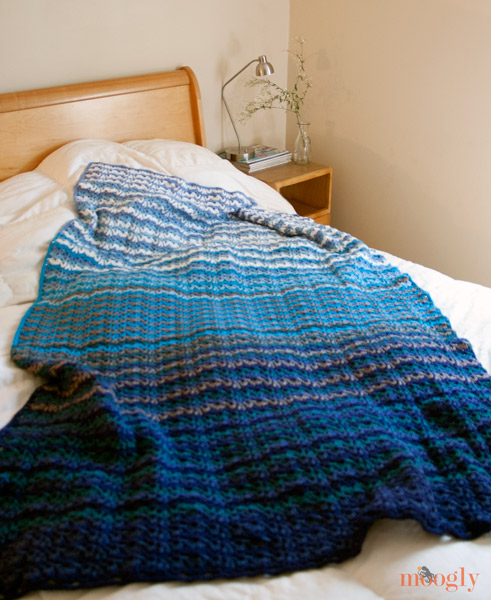
Vintage Wobble Blanket
By Moogly Blog
I love the story behind this blanket and it is one that I have made as a scrapghan. I did every other row as a different color and white. It's a family favorite cuddle blanket.


Colorful Visions Afghan
By Yarnutopia
I just really love the texture that is in this square.


Chic Sheep Day Dream Blanket 
By Marly Bird
There are so many possibilities with this blanket.


flying-afghan
The Flying Afghan 
By the Crochet Dude
When I first started crochet, this was my first big project that I undertook. I still have it. This blanket taught me so many new things. It will always hold a special place in my heart.


Here we Go Do-se-do Blanket 
By Designs By Diligence
I Made this pattern while I was pregnant and I was really trying to whittle down my scraps. It's a great t.v. watching blanket.


Mitered Square Temperature Blanket
By Kaye Adolphson
I love the concept of this one!

Warp and Weft Blanket {Free Crochet Pattern} by Susan Carlson of Felted Button using Scheepjes Stonewashed, Riverwashed and Colour Crafter
Warp and Weft Blanket 
By the Felted Button
I really like this modern take on granny squares, I mean granny rectangles.


Always Pointing North Blanket 
By Designs By Diligence
This is one of the very first blankets I designed. The squares are quick to make and they are join as you go so you can't lose them.


Lara's Lapghan 
by the Loopy Stitch
Again, I just really love all the texture happening in this blanket.


Apple Blossom Baby Blanket 
By Bori Varga
I love the color choices for this blanket. What scraps would you use?

Pin for Later!


Monday, May 7, 2018

Puddles of Love Hat

A Free Tunisian Crochet Pattern


I'm sure I have said this before. I love making baby hats!

I have probably made more baby hats than any other item. It was only natural that I would make a hat to go along with the Puddles of Love Blanket. This hat is made with Tunisian Crochet. To keep it simple it is worked flat and seamed together when you are done. 

This hat is a great option to start with if you find the size of the blanket overwhelming. Try the hat first, master the stitches and then you will be ready for the blanket.

Stay Connected

If you like this pattern be sure to subscribe to Designs by Diligence to get notified when new patterns come out. The only time you will get an email is when a new post happens on the blog, usually on Tuesday.

You can also follow me through my social media sites. I love sharing sneak peeks, wips, and fiber arts news and projects.

Facebook
Instagram
Pinterest


Designer: Julia Schwartz
Yarn: worsted yarn 2 colors 1 skein of the main color and scraps of the second color. Model used   Loops and Threads Impeccable color gold 100 yrds 2.5 oz
Hook: 6mm Tunisian hook (I used the addi click hook with the 24 inch extension cord)
Notions: tapestry needle
Size: 15 inch circumference
Gauge: 15 sts 13 rows equals 4 inches
Special Stitches:
  • TPS (Tunisian Purl stitch): (forward pass) Place yarn in front of your work, insert your hook into the left vertical bar of the st below, yo and pull your yarn through. (Return pass): follow instructions in the pattern.
  • TKS (Tunisian Knit stitch): (Forward pass)working with the yarn behind your work, insert your hook between the vertical bars below the horizontal bars in the st below, yo, pull the yarn through, keep your loop on the hook.(Return pass): follow instructions in the pattern.
    • M1L (make one left):  (forward pass)with yarn behind your work, insert the hook between the stich just made and the vertical bar of the next stitch (Return pass): follow instructions in the pattern.
    • TKS2tog (Tunisian Knit Stitch 2 togeter): (forward pass) working with the yarn behind your work insert the hook through the left vertical bars of the 2 stitches below, pull the yarn through, keep your loop on the hook. (Return pass): follow instructions in the pattern.
    • TKS3tog (Tunisian Knit stitch 3 together): (forward pass) working with the yarn behind your work insert the hook through the left vertical bars of the 3 stitches below, pull the yarn through, keep your loop on the hook. (Return pass): follow instructions in the pattern.

    Notes:

    • Keep your tension loose throughout the whole hat. 
    • There is not a lot of stretch in the hat so be sure your gauge is correct so you end up with the right circumference. 
    • Just like the blanket the hat is a pattern repeat of 10 + 1. 

    Copyright:

    Julia Schwartz. Do not reproduce, copy, distribute, or sell this pattern without permission of the designer. This pattern must not be translated, reproduced, or circulated in another language without prior consent. If you have questions about this pattern please contact Julia.diligence@gmail.com.

    Where Can I Get This Pattern?

    This is a free crochet pattern on the blog. Just keep scrolling down to see this pattern. By having it free on the blog I am able to promote the pattern more and share it with more people. I also feel that I bring some trust to my readers who can read through the pattern before they decide if they want to purchase the pattern.
    If you would like to purchase this pattern that is ads free and printer friendly, it is available for Download through my Ravelry Store For $3.00.

    <--------->buy now<--------->


    Pattern Instructions 


    Row 1: Ch 51, (Forward pass)  insert hook into each ch and pull up a loop for a total of 51 loops on the hook,
    (return pass:) yo, pull through 1 loop, (yo, pull through 2 loops) repeat (to) until you have 1 loop left.


    Row 2-3: (forward pass) {TKS, TPS} repeat {to}for all 51 sts.
    (return pass:) yo, pull through 1 loop, (yo, pull through 2 loops) repeat (to) until you have 1 loop left.

    Row 4-5: (forward pass): TKS 3 times, TPS, TKS, TPS, {TKS 7 times, TPS, TKS, TPS}, Repeat {to} 3 times, TKS 4 times
    (return pass:) yo, pull through 1 loop, (yo, pull through 2 loops) repeat (to) until you have 1 loop left.

    Row 6: (forward pass): TKS, TKS2tog, TPS, M1L, TKS, M1L, TPS, {TKS2tog, TKS 3 times, TKS2tog, TPS, M1L, TKS, M1L, TPS} Repeat {to} 3 times, TKS2tog, TKS 2 times
    (return pass:) yo, pull through 1 loop, (yo, pull through 2 loops) repeat (to) until you have 1 loop left.

    Row 7: (forward pass): TKS2tog, TPS, M1L, TPS, TKS, TPS, M1L, TPS, {TKS2tog, TKS, TKS2tog, TPS, M1L, TPS, TKS, TPS, M1L, TPS} repeat {to} 3 times, TKS2tog, TKS
    (return pass:) yo, pull through 1 loop, (yo, pull through 2 loops) repeat (to) until you have 1 loop left.

    Row 8: (forward pass): TKS, TPS, M1L, TPS, TKS 3 times, TPS, M1L, TPS, {TKS3tog, TPS, M1L, TPS, TKS 3 times, TPS, M1L, TPS} repeat {to} 3 times, TKS2tog
    (return pass:) yo, pull through 1 loop, (yo, pull through 2 loops) repeat (to) until you have 1 loop left.

    Row 9 and 10: (forward pass): {TKS, TPS, TKS, TPS, TKS 3 times, TPS, TKS, TPS}, repeat {to} 4 times, TKS
    (return pass:) yo, pull through 1 loop, (yo, pull through 2 loops) repeat (to) until you have 1 loop left.

    Row 11: (forward pass): TKS, TPS, TKS2tog, TPS, TKS, TPS, TKS2tog, TPS, {M1L, TKS, M1L, TPS, TKS2tog, TPS, TKS, TPS, TKS2tog, TPS} repeat {to} 3 times, M1L, TKS
    (return pass:) yo, pull through 1 loop, (yo, pull through 2 loops) repeat (to) until you have 1 loop left.

    Row 12: (forward pass): TKS, M1L, TPS, TKS2tog, TKS, TKS2tog, TPS, {M1L, TKS 3 times, M1L, TPS, TKS2tog, TKS, TKS2tog, TPS} repeat {to} 3 times, M1L, TKS 2 times
    (return pass:) yo, pull through 1 loop, (yo, pull through 2 loops) repeat (to) until you have 1 loop left.

    Row 13: (forward pass): TKS 2 times, M1L, TPS, TKS3tog, TPS, {M1L, TKS 5 times, M1L, TPS, TKS3tog, TPS} repeat {to} 3 times M1L, TKS 3 times
    (return pass:) yo, pull through 1 loop, (yo, pull through 2 loops) repeat (to) until you have 1 loop left.

    Row 14:(forward pass): TKS 3 times, TPS, TKS, TPS, {TKS 7 times, TPS, TKS, TPS}, Repeat {to} 3 times, TKS 4 times
    (return pass:) yo, pull through 1 loop, (yo, pull through 2 loops) repeat (to) until you have 1 loop left.


    Rows 15- 20: Repeat rows 4-9

    Decrease Crown

    Row 21:  (forward pass): TKS, TPS, TKS2tog, TPS, TKS, TPS, TKS2tog, TPS, {TKS, TPS, TKS2tog, TPS, TKS, TPS, TKS2tog, TPS} repeat {to} 3 times, TKS
    (return pass:) yo, pull through 1 loop, (yo, pull through 2 loops) repeat (to) until you have 1 loop left.

    Row 22: (forward pass): TKS, TPS, TKS2tog, TKS, TKS2tog, TPS, {TKS, TPS, TKS2tog, TKS, TKS2tog, TPS} repeat {to} 3 times, TKS 
    (return pass:) yo, pull through 1 loop, (yo, pull through 2 loops) repeat (to) until you have 1 loop left.

    Row 23: (forward pass): TKS, TPS, TKS3tog, TPS, {TKS, TPS, TKS3tog, TPS} repeat {to} 3 times TKS 
    (return pass:) yo, pull through 1 loop, (yo, pull through 2 loops) repeat (to) until you have 1 loop left.

    Row 24: (forward pass): (TKS2tog) repeat all the way across, TKS in last st
    (return pass:) yo, pull through 1 loop, (yo, pull through 2 loops) repeat (to) until you have 1 loop left.

    Finish off.
    Leave a long tail to seam up the top and side seam.
    Seam the top and side seam with a wip stitch.
    Weave in your ends.

    More Patterns You Will Love


    Tulips Aplenty Dress

    Infant Hat in Simple Cables

    Pin For Later!


    Tuesday, April 24, 2018

    How to Add a Zipper and Line a Knit Bag

     A Free Picture Tutorial 


    I wanted to show you how easy it is to add a zipper and lining to a knit bag which gives the bag a more professional look. 

    Let's Get Started

    First get all of your pieces together. You will need: 
    • your lining fabric that is cut our in inch larger than your knit fabric
    • your 2 knit sides of the bag
    • a zipper the same size as your opening 12 inch shown
    • and purse handles
    Other materials you will need
    • sewing machine
    • thread
    • extra yarn for wip stitching the knit sides together 
    • and a yarn needle


    You will need to sew the two lining pieces to the zipper with the zipper up and the fabric down. I always like to make a running stitch across the top edge to make it clean and crisp.

    With the zipper facing up and lining down, pin down the knit sides to the zipper and sewing across the zipper. Do this for both sides. 


    Sew on your handles. Make sure they are centered and straight. 


    Sew the lining fabric together with fronts facing each other. Trim extra fabric from the seam. 


    Flip the knit fabric over the lining and wip stitch the knit sides together with a yarn needle. Weave in your ends and you are done. That's it. Now Go try it for yourself!

    Pin for Later!

    Come This Way Purse

    A Free Knitting Pattern


    I have to tell you a story. I thought I was designing a cowl, and my husband came home from school and looked at what I was making and said, "Oh, are you making a bag?" I looked down at what I was making, and said, "yep, I guess I am." And that is how this purse was born. He saw the vision before I did. I love that he did and I love all the texture that is on this bag.

    This Purse was a quick project. I was able to make it in a weekend. Even though there is a lot happening, the stitches are easy to master. I added a zipper and lined the purse. At the end of the post I have a link to another post showing how I did that. I also made my own handles for the purse, but I think it would look fabulous with re-purposed handles from a bag you are not using any more. 


    Where can I get this Pattern?

    This is a free knitting pattern found right here on Designs by Diligence. Just keep scrolling down to read the pattern. If you would like to purchase an ads free, printer friendly PDF you can through my Ravelry Pattern Store for $3.00. As a bonus for purchasing the pattern you will receive a chart and key along with the written pattern.

    <---------->buy now <---------->

    Save this Pattern to your favorites!
    come this way purse


    Pattern

    Designer: Julia Schwartz
    Yarn: Any worsted weight yarn. Model used Patons yarn Canadiana Color Fool's gold 100% acrylic 100g 187m
    Needles: 7/ 4.5mm
    Notions: yarn needle for sewing up the bag, (lining, zipper, handles, sewing machine, and thread optional)
    Gauge: 20 sts and 26 rows
    Size: 12 by 10 in
    Stitches used: k, p, RT, LT, lateral braid
    Special Stitches: 

    • Right Twist (RT): Knit 2 together keeping both stitches on the left needle, knit into the first stitch, then pull both stitches onto the right needle, stitch complete.
    • Left Twist (LT): Knit through the back loop of the 2nd st, keep the stitch on the left needle, knit in the first stitch, then pull both stitches onto the right needle, stitch complete.
    • Lateral braid: Knit through the back  loop of the 2nd st, keep the stitch on the left needle, knit in the first stitch, then pull both stitches onto the right needle, slip the last stitch made back onto the left needle, continue repeating the stitch all the way across the row.  

    Copyright
    Julia Schwartz. Do not reproduce, copy, distribute, or sell this pattern without permission of the designer. This pattern must not be translated, reproduced, or circulated in another language without prior consent. If you have questions about this pattern please contact Julia.diligence@gmail.com.


    Instructions (repeat 2 times for both sides of the purse):


    Cast on 40 st using your favorite cast on
    Row 1: (K, P) repeat (to) all 40 sts
    Row 2 and 3: (P, K) repeat (to) all 40 sts
    Row 4: (k, p) repeat (to) all 40 sts
    At the end of row 4 cast on 5 sts
    Row 5: (p, k) repeat (to) all 45 sts
    At the end of row 5 cast on 5 sts
    Row 6 and 7: (k,p) repeat (to) all 50 sts
    Row 8: (p, k) repeat (to) all 50 sts 
    Row 9: Make a lateral braid across the row
    Row 10: p
    Row 11: (K 3, LT, ) repeat (to) 8 times, k 5
    Row 12: p
    Row 13: k 4, LT, (K3, LT) repeat (to) 7 times, k 4
    Row 14: p
    Row 15: K 5, LT, (K3, LT) repeat (to) 7 times, k 3
    Row 16: p
    Row 17: K5, RT, (K3, RT) repeat (to) 7 times, k3
    Row 18: p
    Row 19:  k 4, RT, (K3, RT) repeat (to) 7 times, k 4
    Row 20: p
    Row 21: (K 3, RT, ) repeat (to) 8 times, k 5
    Row 22: p
    Row 23: Make a lateral braid across the row
    Row 24 and 25: (p, k) repeat (to) all 50 sts
    Row 26 and 27: (K, p) repeat (to) all 50 sts
    Row 28: (p, k) repeat (to) all 50 sts
    Row 29: Make a lateral braid across the row
    Row 30:P
    Row 31: K5, RT, (K3, RT) repeat (to) 7 times, k3
    Row 32: p
    Row 33:  k 4, RT, (K3, RT) repeat (to) 7 times, k 4
    Row 34: p
    Row 35: (K 3, RT) repeat (to) 8 times, k 5
    Row 36: p
    Row 37: (K 3, LT) repeat (to) 8 times, k 5
    Row 38: p
    Row 39: k 4, LT, (K3, LT) repeat (to) 7 times, k 4
    Row 40: p
    Row 41: K 5, LT, (K3, LT) repeat (to) 7 times, k 3
    Row 42: p
    Row 43: Make a lateral braid across the row
    Row 44 and 45: (p, k) repeat (to) all 50 sts
    Row 46 and 47: (K, p) repeat (to) all 50 sts
    Row 48: (p, k) repeat (to) all 50 sts
    Row 49: Make a lateral braid across the row
    Row 50: P
    Cast off. 
    Weave in your ends. 
    Wip stitch the 2 sides and bottom together, or Follow This Link for adding a zipper and liner to your bag. 


    Stay Connected

    If you like this pattern be sure to subscribe to Designs by Diligence to get notified when new patterns come out. The only time you will get an email is when a new post happens on the blog, usually on Tuesday.

    You can also follow me through my social media sites. I love sharing sneak peeks, wips, and fiber arts news and projects.

    Facebook
    Instagram
    Pinterest


    More Patterns You Would Love

    Swift Swirl Cowl

    Baby Helix Hat


    Pin for Later!


    Monday, April 9, 2018

    Sew Your Own Drawstring Project Bag

    A free picture tutorial


    Every once in a while I get the itch to sew something on the sewing machine. Lately I have been making these drawstring project bags. They are the perfect size for holding a one skein project like  a hat or cowl. It's been a good way to use up my scraps and they are keeping my wips organized.

    Let's see how I make them

    Supplies:

    • 2- 8 by 9 in jean material with 2 inch notches cut out on the 8 inch sides
    • 4- 9 by 10 in pieces for the out side and lining of the bag
    • 16 by 4 fabric matching the lining fabric for the drawstring top
    • ribbon for drawstring
    • large bead or button
    • optional- jean pocket and other embellishments
    • sewing machine
    • sewing thread 
    • pins 

    sorry this one is so blurry 


    The first thing I do is sew the bottoms and sides together making sure the right side are facing each other. I also like to make a running stitch down the seam for a nice finish. Optional sew the pocket onto the front of the bag.


    At this point you will have your outside and inside


    Next sew the sides of the bag together. On one of the sides of the lining leave a 3 inch hole so you can turn it right side out later. 


    Sew the bottom together to look like the picture above. This will give your bottoms a nice level place to sit. 


    Put the lining and outside together with the right sides facing together. This picture is actually wrong. You want the lining on top so you can pull your fabric through the hole. 


    Turn the bag right side out so that it looks just how you want it to look like. Sew together the hole in the lining with a wip or ladder stitch. Sew a hem on each of the 4 inch sides of the 4 by 16 inch piece of fabric. fold it over like basting tape and then pin it around the top of the bag leaving the openings on the side seam of the bag. Sew the drawstring flap to the bag.


    Add the ribbon to the bag using a safety pin to push it through  to the other side. String the large bead or button through both ends of the ribbon. Then add a knot to the ribbon ends to close in the button. 

    Pin for Later!


    Stay connected!

    If you like this pattern be sure to subscribe to Designs by Diligence to get notified when new patterns come out. The only time you will get an email is when a new post happens on the blog, usually on Tuesday.

    You can also follow me through my social media sites. I love sharing sneak peeks, wips, and fiber arts news and projects.

    Facebook

    Instagram

    Pinterest

    More Patterns You Will Love


    Monday, April 2, 2018

    Puddles of Love Baby Blanket

    A Free Tunisian Crochet Pattern


    I love how this blanket turned out. The texture is just wonderful. Tunisian crochet is typically thicker than any other stitch technique, so this blanket is extra squishy. It's the perfect kind of blanket that I love to put on the floor to let baby roll around on and play. I also really love the pop of color edging. You can start the blanket early and then when you know what the baby will be you can add your color of choice for the edging.


    I used one ball of caron yarn one pound. I used every inch of it, so you might want to grab two just to be on the safe side. *As of 9/30/2022 I have also made the blanket using 10 skeins of Lion Brand Wool Ease.* Your tension might be different than mine so your yardage might change. I like to keep a really loose tension when I am working with Tunisian Crochet. I think it helps keep it from curling so much, and it helps my hand not hurt so much when working with the longer hook. I would also recommend using a Tunisian hook that has a cord attachment. because this blanket gets pretty heavy and the cord makes it so you don't have to hold it all up.


    This is a free pattern. If you choose to purchase an ads free printer friendly version, you will get everything you see in the blog post plus a chart to help you follow along. This pattern is easy to adapt to a different size, but the yardage will change. The pattern is a repeated pattern f 10 +1.

    I have made a matching infant hat to go along with this blanket pattern. Go check it out Here!   


    Where Can I Get This Pattern?


    This is a free crochet pattern on the blog. Just keep scrolling down to see this pattern. By having it free on the blog I am able to promote the pattern more and share it with more people. I also feel that I bring some trust to my readers who can read through the pattern before they decide if they want to purchase the pattern.

    If you would like to purchase this pattern that is ads free and printer friendly, it is available for Download through my Ravelry Store For $3.00.
    <----->buy now<--------->
    This pattern has been newly updated with it being thoroughly checked through, and newly formatted as of 9/30/22. 


    Designer: Julia Schwartz
    Yarn: Any size 4 worsted weight yarn 1900 yards/30 0nces of yarn needed
    Hook: 6mm Tunisian hook (I used the addi click hook with the 40 inch extension cord)
    Notions: tapestry needle
    Size: 36 by 42 inches
    Gauge: 15 sts 13 rows equals 4 inches
    Special Stitches:
    • TPS (Tunisian Purl stitch): (forward pass) Place yarn in front of your work, insert your hook into the left vertical bar of the st below, yo and pull your yarn through. (Return pass): follow instructions in the pattern.
    • TKS (Tunisian Knit stitch): (Forward pass)working with the yarn behind your work, insert your hook between the vertical bars below the horizontal bars in the st below, yo, pull the yarn through, keep your loop on the hook.(Return pass): follow instructions in the pattern.
    • M1L (make one left):  (forward pass)with yarn behind your work, insert the hook between the stich just made and the vertical bar of the next stitch (Return pass): follow instructions in the pattern.
    • TKS2tog (Tunisian Knit Stitch 2 togeter): (forward pass) working with the yarn behind your work insert the hook through the left vertical bars of the 2 stitches below, pull the yarn through, keep your loop on the hook. (Return pass): follow instructions in the pattern.
    • TKS3tog (Tunisian Knit stitch 3 together): (forward pass) working with the yarn behind your work insert the hook through the left vertical bars of the 3 stitches below, pull the yarn through, keep your loop on the hook. (Return pass): follow instructions in the pattern.
    • reverse single crochet: working left to right instead of right to left, insert your hook into the st to your right, yo, and pull through, yo and pull through 2 loops

    Notes:

    • border refers to the first and last 10 stitches of each row. Even rows it is {TKS, TPS} odd rows it is {TPS, TKS} 
    • Keep your tension loose throughout the whole blanket. 

    Copyright:

    Julia Schwartz. Do not reproduce, copy, distribute, or sell this pattern without permission of the designer. This pattern must not be translated, reproduced, or circulated in another language without prior consent. If you have questions about this pattern please contact Julia.diligence@gmail.com.

    Pattern Instruction


    Row 1: (Forward pass) Ch 121, insert hook into each ch and pull up a loop for a total of 121 loops on the hook,

    (return pass:) Yo, pull through 1 loop, (yo, pull through 2 loops) repeat (to) until you have 1 loop left.


    Row 2: (Forward pass) {TKS, TPS} repeat {to} to the second to last st, TKS in the last st.

    (Return pass:) yo, pull through 1 loop, (yo, pull through 2 loops) repeat (to) until you have 1 loop left.


    Row 3: (Forward pass) {TPS, TKS} repeat {to} to the second to last st, TKS in the last st.

    (Return pass:) yo, pull through 1 loop, (yo, pull through 2 loops) repeat (to) until you have 1 loop left.


    Rows 4-7: Repeat rows 2 and 3


    Row 8 -10: (Forward pass): Border (see notes), TKS 4 times, TPS, TKS, TPS, {TKS 7 times, TPS, TKS, TPS}, Repeat {to} 8 times, TKS 4 times, border.

    (Return pass:) yo, pull through 1 loop, (yo, pull through 2 loops) repeat (to) until you have 1 loop left.


    Row 11: (Forward pass): Border, TKS 2 times, TKS2tog, TPS, M1R, TKS, M1R, TPS, {TKS2tog, TKS 3 times, TKS2tog, TPS, M1R, TKS, M1R, TPS} Repeat {to} 8 times, TKS2tog, TKS 2 times, border.

    (Return pass:) yo, pull through 1 loop, (yo, pull through 2 loops) repeat (to) until you have 1 loop left.


    Row 12: (Forward pass): Border, TKS, TKS2tog, TPS, M1R, TPS, TKS, TPS, M1L, TPS, {TKS2tog, TKS, TKS2tog, TPS, M1R, TPS, TKS, TPS, M1L, TPS} repeat {to} 8 times, TKS2tog, TKS, Border

    (Return pass:) yo, pull through 1 loop, (yo, pull through 2 loops) repeat (to) until you have 1 loop left.


    Row 13: (Forward pass): Border, TKS2tog, TPS, M1r, TPS, TKS 3 times, TPS, M1L, TPS, {TKS3tog, TPS, M1r, TPS, TKS 3 times, TPS, M1L, TPS} repeat {to} 8 times, TKS2tog, Border.

    (Return pass:) yo, pull through 1 loop, (yo, pull through 2 loops) repeat (to) until you have 1 loop left.


    Row 14 and 15: (Forward pass): Border, {TKS, TPS, TKS, TPS, TKS 3 times, TPS, TKS, TPS}, repeat {to} 9 times, TKS, border

    (Return pass:) yo, pull through 1 loop, (yo, pull through 2 loops) repeat (to) until you have 1 loop left.


    Row 16: (Forward pass): Border, TKS, M1L, TPS, TKS2tog, TPS, TKS, TPS, TKS2tog, TPS, {M1L, TKS, M1L, TPS, TKS2tog, TPS, TKS, TPS, TKS2tog, TPS} repeat {to} 8 times, M1L, TKS, border

    (Return pass:) yo, pull through 1 loop, (yo, pull through 2 loops) repeat (to) until you have 1 loop left.


    Row 17: (Forward pass): Border, TKS 2 times, M1L, TPS, TKS2tog, TKS, TKS2tog, TPS, {M1L, TKS 3 times, M1L, TPS, TKS2tog, TKS, TKS2tog, TPS} repeat {to} 8 times, M1L, TKS 2 times, border.

    (Return pass:) yo, pull through 1 loop, (yo, pull through 2 loops) repeat (to) until you have 1 loop left.


    Row 18: (Forward pass): Border, TKS 3 times, M1L, TPS, TKS3tog, TPS, {M1R, TKS 5 times, M1L, TPS, TKS3tog, TPS} repeat {to} 8 times M1R, TKS 3 times, Border

    (Return pass:) yo, pull through 1 loop, (yo, pull through 2 loops) repeat (to) until you have 1 loop left.


    Row 19-20:(Forward pass): Border, (TKS, TPS) repeat (to) 4 times (10 total stitches), TKS 4 times, TPS, TKS, TPS, {TKS 7 times, TPS, TKS, TPS}, Repeat {to} 8 times, TKS 4 times, (TPS, TKS) repeat (to) 4 times, border

    (Return pass:) yo, pull through 1 loop, (yo, pull through 2 loops) repeat (to) until you have 1 loop left.


    Continue repeating rows 8 through 20 until you are 2 inches from your desired length.

    Repeat rows 2 and 3 for 7 rows to finish off the border.

    Finish off


    Finish off 

    Edging


    Round 1:  Attach yarn with a ch st at any corner and make 2 hdc in the corner stitch, hdc in each st around and 2 hdc in each corner st, sl st into first st.

    Row 2: Ch 1, reverse sc in each stitch around, sl st in first st. 

    Finish off. 
    weave in your ends.

    Stay connected!


    If you like this pattern be sure to subscribe to Designs by Diligence to get notified when new patterns come out. The only time you will get an email is when a new post happens on the blog, usually on Tuesday.

    You can also follow me through my social media sites. I love sharing sneak peeks, wips, and fiber arts news and projects.

    Facebook
    Instagram
    Pinterest

    More Patterns You Will Love

    Pin for Later!


    Monday, March 19, 2018

    Painted Butterfly

    A Free Crochet Pattern 

    Ever since I made my painted sunflower. I've been wanting to make and paint something else. My girls and I had so much fun coming up with these butterflies to help bring in the Spring weather. They have been begging me to make some more so they can decorate and paint mom's creations. This was a great project to get them involved, and excited about fiber art. All fiber art doesn't have to be soft and covered in granny squares. It can be hardened and painted for a whole new look. 

    Even if you don't want to stiffen them they would make great appliques to any bag or hat. I used Red Heart Luster Sheen for the thread. Some times this thread is hard to find but they still have it at my Wal-mart.  You can substitute with any size 3 fashion thread, or you can put two strands of six 10 together.  


    Where Can I Get This Pattern?

    This is a free crochet pattern on the blog. Just keep scrolling down to see this pattern. By having it free on the blog I am able to promote the pattern more and share it with more people. I also feel that I bring some trust to my readers who can read through the pattern before they decide if they want to purchase the pattern.

    If you would like to purchase this pattern that is ads free and printer friendly, it is available for Download through my Ravelry Store For $3.00.

    <--------->buy now<_-------->


    Designer: Julia Schwartz
    Yarn: Redheart Lustersheen size 2:fine 4 oz, 335 yrds, 100% acrylic 
    Hook: F/5 3.75mm
    Notions: yarn needle to weave in your ends, sugar starch, acrylic paint, paint brush 
    Size: 5 by 6 1/2 inches
    Gauge: 20 sc and 26 rows equals 4 in/ 10 cm. 
    Stitches Used: ch, sl st, dc, dc2tog,  i-cord
    Notes: You don't have to starch and paint this project. It looks great just as an applique. Try using different colors of yarn. Make this project your own. 
    Copyright:
    Julia Schwartz. Do not reproduce, copy, distribute, or sell this pattern without permission of the designer. This pattern must not be translated, reproduced, or circulated in another language without prior consent. If you have questions about this pattern please contact Julia.diligence@gmail.com.


    Pattern:

    Start of Butterfly

    Row 1: Ch 8 (counts as first dc, ch 5), dc in the 4th ch from hook, dc in the next 3 ch, 5 dc in the next ch, rotate work around and working in chs already used dc in the next 3 chs, 3 dc in the 1st ch, sl st into the first dc (16 sts)

    Row 2: Ch 3( counts as first dc here and throughout pattern), dc in same st, dc in the next 5 dc, 2 dc in each f the next 3 dc, dc in the next 5 dc, 2 dc in each of the next 2 dc, sl st into the first dc. (22 sts)

    Do not finish off.

    Small wing

    Row 1: Ch 3, 1 dc in the same st, dc in the next 3 dc, 2 dc in the next dc (7st)

    Row 2: Ch 3, turn, dc in the same st, dc in the next 5 dc, 2 dc in the last dc (9st)

    Row 3: Ch 2, turn, dc in the next 6 dc, dc2tog in the last 2 dc, (7st)

    Row 4: Ch 2, turn, dc in the next 4 dc, dc 2tog in the last 2 dc (5st)

    Row 5: Ch 2, turn, dc in the next 2 dc, dc2tog (3 st)

    Row 6: Ch 2, turn, dc2tog

    Finish off

    Large Wing (make 2)


    Row 1: In the next open dc of row two of start of butterfly, attach yarn with sl st, Ch 3, 2 dc in the same st, dc in the next 3 dc, 3 dc in the last dc (9sts)

    Row 2: Ch 3, turn, 1 dc in the same st, 7 dc in the next dc, 2 dc in the last dc (11 sts)

    Row 3: Ch 2, turn, dc in the next 8 dc, dc2tog in the last dc (9sts)

    Row 4: Ch 2, turn, dc in the next 6 dc, dc2tog in the last dc (7 sts)

    Row 5: Ch 2, turn, dc in the next 4 dc, dc2tog in the last dc (5 sts)

    Row 6: Row 5: Ch 2, turn, dc in the next 2 dc, dc2tog (3 st)

    Row 7: Ch 2, turn, dc2tog

    Finish off.

    2nd small wing

    Attach yarn with a sl st at the next open dc of round 2 of start of Butterfly, and follow rows 1 through 6 of small wing.

    I-cord Body


    Make a slip knot, ch 5, pull up a loop in each ch, Take the back 4 loops off the hook and put them on the cable needle, (yo and pull through one loop on the hook, take the next st off the cable needle and onto your hook) repeat (to) 4 times

    continue repeating for 55 rows.

    Finish off and weave in your ends.

    Follow the pictures and tie the butterfly body together and to the wings.

    Starching

    I like using sugar starch.

    You will need handy some cardboard covered with wax paper.

    Mix 1 cup of sugar with ½ a cup of water, put it over medium heat, and stir it until the sugar melts and becomes translucent, this will happen right before boiling.

    Take the starch off of the heat.

    Soak your butterfly in the starch, making sure all parts of it is saturated. It will be hot and sticky so take caution when taking it out, ring out or let it drip off all excess starch.

    Place it on the wax paper covered cardboard stretch and place it how you like and then let it sit to dry.

    Depending on the weather it should dry and harden in 48 to 72 hours.

    Paint!


    Stay connected!

    If you like this pattern be sure to subscribe to Designs by Diligence to get notified when new patterns come out. The only time you will get an email is when a new post happens on the blog, usually on Tuesday.

    You can also follow me through my social media sites. I love sharing sneak peeks, wips, and fiber arts news and projects.

    Facebook

    Instagram

    Pinterest

    More Crochet Patterns You Will Love


    Pin For Later!